


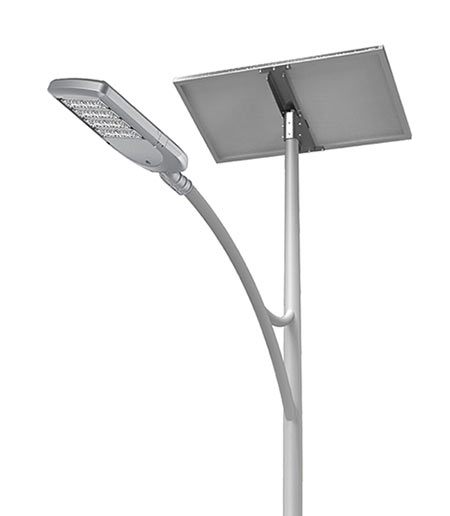
JIEYAO Series Smart Lithium Battery Solar LED Street Light integrates LED lighting, an ultra-long-life LiFePO₄ (lithium iron phosphate) battery pack, a high-efficiency intelligent controller, and a full aluminum housing into one compact system.
This product is not only ideal for maintenance and replacement of traditional split-type solar street lights, but also serves as a brand-new, highly cost-effective solution for new installations of lithium battery solar street lighting systems.
The JIEYAO smart lithium battery solar LED street light offers key advantages such as longer service life, easier installation, and lower maintenance, providing you with a more reliable and efficient solar lighting solution.
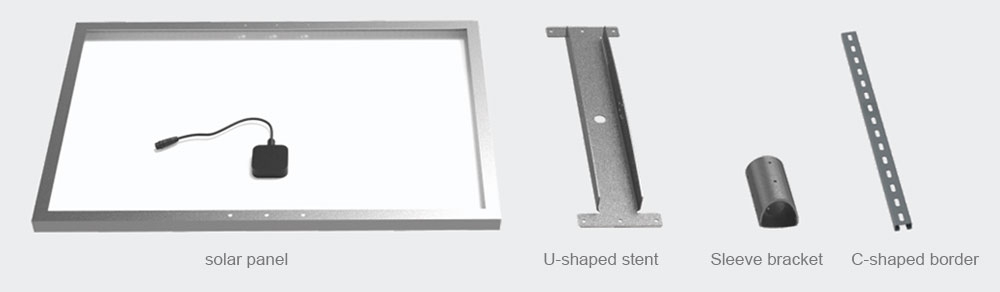
Product Components
Solar panel components:
fittingsofamachine:

Parts List
Before installation,verify that all components are complete. The components and quantities in each set are listed below:
Thesolarpanelcomponentlistincludes:
Name | 50W (Qty) | 80W (Qty) | 110W (Qty) | 130W/180W (Qty) |
Solar panel | 1 | 1 | 1 | 1 |
U-shaped stent | 1 | 1 | 1 | 1 |
Sleeve bracket | 1 | 1 | 1 | 1 |
2-meter waterproof cable | 1 | 1 | 1 | 1 |
M8 × 40 | 4 | |||
M8 × 25 | 4 | 4 | 4 | 10 |
M8 × 16 | 14 | 14 | 14 | 8 |
M8 flat washer | 10 | 10 | 10 | 14 |
M8 gasket | 10 | 10 | 10 | 14 |
M8 nut | 6 | 6 | 6 | |
Self-tapping screw | 4 | 6 | 8 | 6 |
C-shaped border | 2 |
Lamp accessories include:
Name | UP15/UP20 | UP30/UP40 | UP50/UP60 |
quantity | |||
M8×16 | 6 | 6 | 6 |
Matters Need Attention
Please read the following precautions carefully before using the Jieyao series solar street lights to avoid personal injury or product failure caused by improper use.
Electric Shock Warning
・ Preventing Electric Shock: To avoid the risk of electric shock, the installation of street lights equipped with AC adapters must be performed by professional personnel with valid street light construction qualifications.
・ Custom Product Confirmation: Street lights with AC adapters are customized products. Before installation, please confirm that the AC adapter complies with local municipal power standards.
・ Installation Safety: During the installation process, ensure that the municipal power supply is completely disconnected and that proper waterproof and insulation protection measures are in place.
Working Conditions
・ Protection Rating: This product has an IP65 protection rating.
・ Wind Resistance: The high-strength structural design can withstand Category 3 typhoons (58m/s); exceeding this intensity may cause damage to the street light.
・ Operating Temperature: The standard operating temperature range is -20°C to 60°C (charging is limited to 0°C to 60°C). Products equipped with a heating function can be used in environments ranging from -40°C to 60°C.
Transportation and Storage
・ Battery Safety: This product contains high-capacity lithium battery components. Please follow aviation transportation regulations and standards during transport.
・ Storage Hazard: Store as a flammable and explosive item, and keep it isolated from other goods.
・ Fragile Handling: The solar panels in this product are fragile. Stacking is limited to a maximum of two layers. Do not exceed this limit or place heavy objects on top.
・ Storage Environment: Please store the product in an environment between 0°C and 45°C.
・ Long-term Storage: If stored for a long period, the product must be charged every 6 months. Use a dedicated charger (sold separately) to avoid damaging the battery or equipment.
Product Maintenance
・ To ensure the solar panel can effectively receive sunlight during use, please regularly clean the surface of the solar panel with a soft cloth and clean water. Do not use chemical agents with strong dissolving properties such as ammonia or benzene, nor abrasive cleaners.
・ The light source and other electronic components of this lighting equipment may only be replaced by the manufacturer, its authorized service agents, or similarly qualified personnel. Unauthorized replacement or the use of third-party parts is prohibited, as this may cause serious damage to the product. If the user disassembles the product without authorization, the warranty will be void.
・ If you need to order replacement parts or accessories, please visit our official website: www.jieyaolighting.com
Product Recycling
・ This product is made from high-performance recyclable materials and components. Do not dispose of this product together with household waste.
・ Please familiarize yourself with local regulations on the separate collection of electrical and electronic equipment. Proper disposal of old products helps prevent potential negative impacts on the environment and human health.
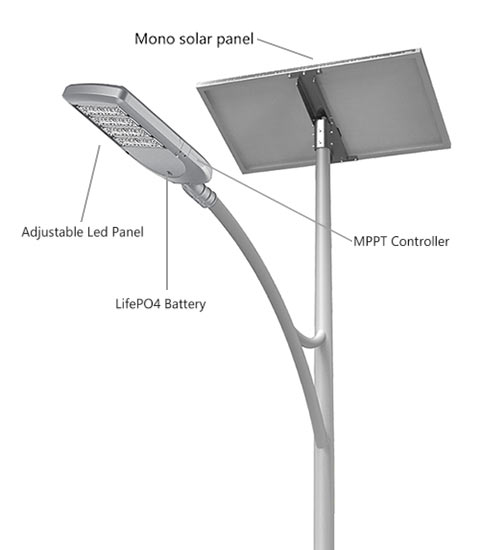
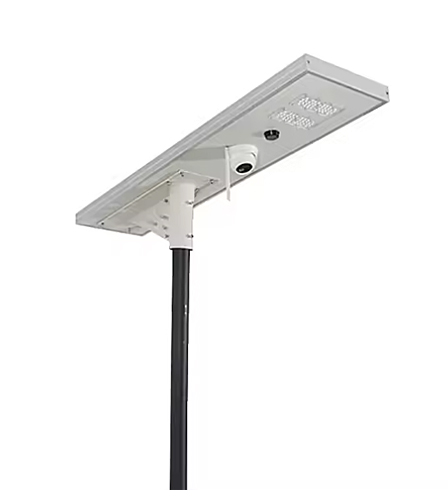
Functional Description
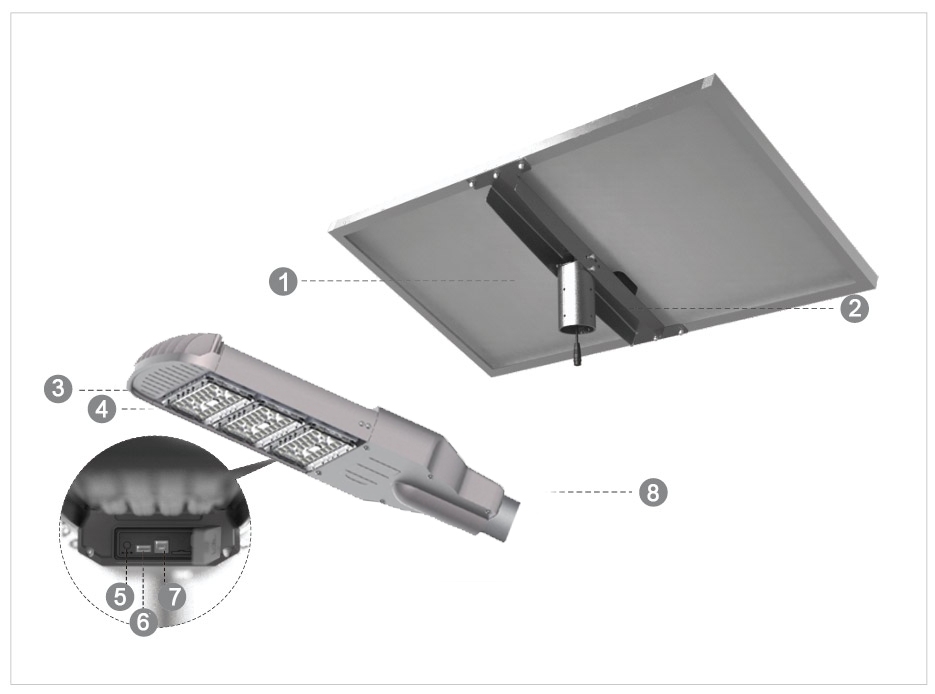
No | Name | Function Description |
1 | Solar Panel | Absorbs solar energy, converts it into electrical energy, and controls the light ON/OFF via a light sensor. |
2 | Solar Panel Bracket | Used to fix and support the solar power generation system. |
3 | PIR Motion Sensor | Automatically adjusts brightness through human motion detection. |
4 | LED Lamp | Provides illumination. |
5 | LED Street Light ON/OFF Button | Turns the LED street light on or off at night. |
6 | USB Type-A Charging Port | Used for battery charging (with 14V, 1.5A dedicated charger). |
7 | USB Type-B Port | Dedicated port for program flashing. |
8 | Street Light Bracket | Used to fix and support the LED street light. |
User Instructions
1. Operating Mode Definitions
・ Power-Off Mode: The system does not operate; neither charging nor discharging is performed.
・ Shipping Mode: The system will automatically power off within 1 hour and enter Power-Off Mode.
・ Power-On Mode: The system operates normally. It automatically charges during the daytime and automatically discharges at night.

2. Power On
・ Daytime Power-On
When there is sufficient daylight (>30 lx), connect the product to the solar panel. The light will turn on for about 20 seconds and then turn off. This indicates that the product has been successfully powered on and entered Power-On Mode.
If the daylight level is insufficient, please use the nighttime power-on method.
・ Nighttime Power-On
Press and hold the button for 5 seconds until the light turns on. Release the button and the light will turn off, indicating that the system has entered Power-On Mode.
After the light turns off, if the ambient light level meets the lighting condition (<30 lx), the light will turn on automatically; otherwise, it will remain off.
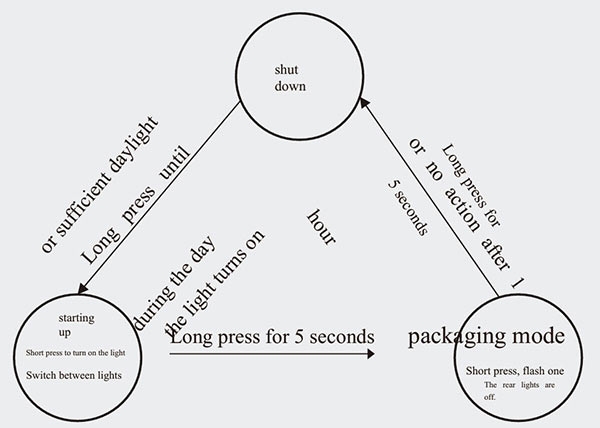
3. Button Operation
Press the button briefly (1 second) to check the current operating mode of the product:
・ Power-Off Mode: Press the button briefly. If the light status does not change, the product is in Power-Off Mode.
・ Shipping Mode: Press the button briefly. If the light flashes once and then turns off, the product is in Shipping Mode.
・ Power-On Mode: Press the button briefly. If the light switches directly between ON and OFF, the product is in Power-On Mode. In this mode, you can turn the light ON or OFF by pressing the button briefly.
Press and hold the button (5s) to switch product modes:
・ Power-off mode: When the solar panel is connected and receiving normal sunlight, the product will automatically turn on; or, press and hold the button for 5 seconds, the light will turn on and then off, and the product will enter power-on mode.
・ Power-on mode: Press and hold the button for 5 seconds, the light will flash 3 times and then turn off, and the product will enter packing/transport mode; if the solar panel is disconnected, the product will immediately enter power-off mode.
・ Packing/transport mode: Press and hold the button for 5 seconds, the light will flash once and then turn off, and the product will enter power-off mode; or, if no operation occurs within 1 hour, the product will automatically enter power-off mode.
4. The solar panel module for the PLUS series solar street lights is optional. You can use your own existing solar panels, or choose our standard solar panel modules with mounting kits.
5. The solar panel output voltage is 18 VDC, with a power range of 50 Wp–180 Wp. Exceeding this range may affect operational efficiency.
6. If you choose to use your own solar panel, simply connect the output wires from the solar panel to the solar panel input wires of the PLUS series solar street light, and it will work.
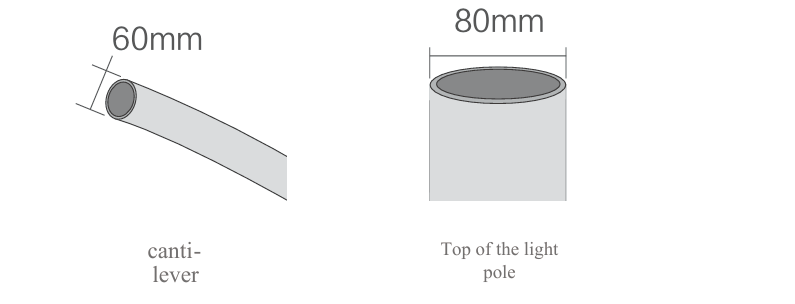
7.For the PLUS series solar street lights, a cantilever pole is recommended. The diameter of the pole at the top where the solar panel bracket is installed should not exceed 80 mm, and the cantilever should not exceed 60 mm.
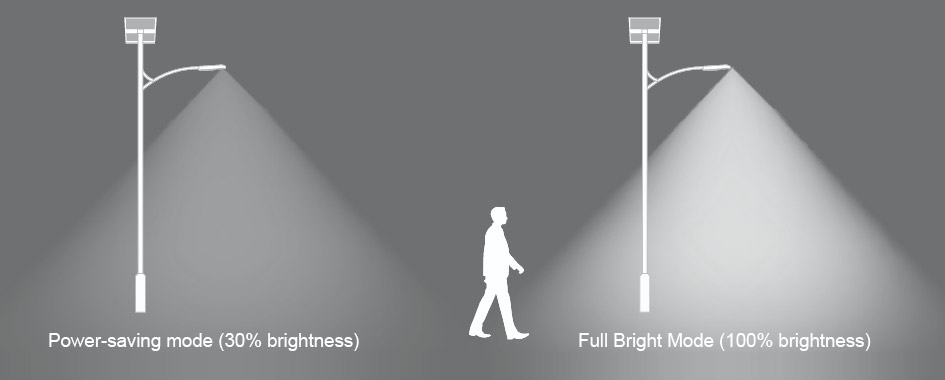
8. This product is factory-configured to operate via the solar panel light sensor (light control threshold: 30 lx), meaning it automatically turns on at dusk and off at dawn. At night, when no one is nearby, the street light operates in power-saving mode. When someone approaches, the street light switches to full brightness.
Product Installation
1. Installation Environment
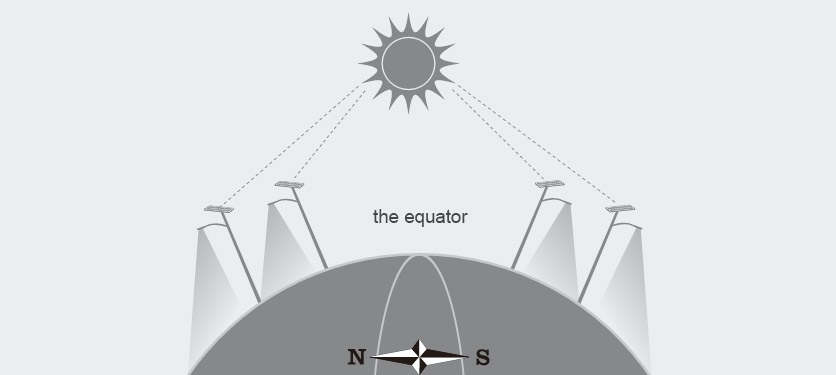
① Please select the appropriate product model based on the local sunlight intensity and the required operating hours. For installations in the Northern Hemisphere, orient the solar panel as much as possible toward the south; for installations in the Southern Hemisphere, orient the solar panel toward the north.
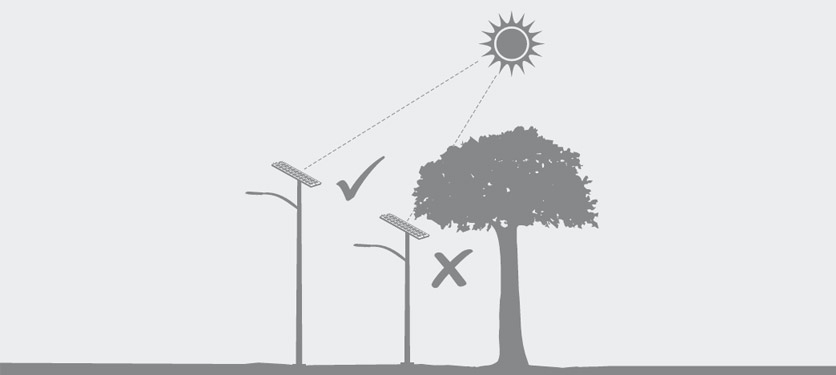
② During installation, make sure the solar panel is not shaded by buildings or trees, as this may reduce the power generation efficiency of the solar system and affect the operation of the street light.
If you choose the LEADSUN solar panel module and mounting kit, please follow the installation method below. If you use your own solar panel module, you may refer to this method as well.
2. Installation of the Solar Panel Mounting Kit
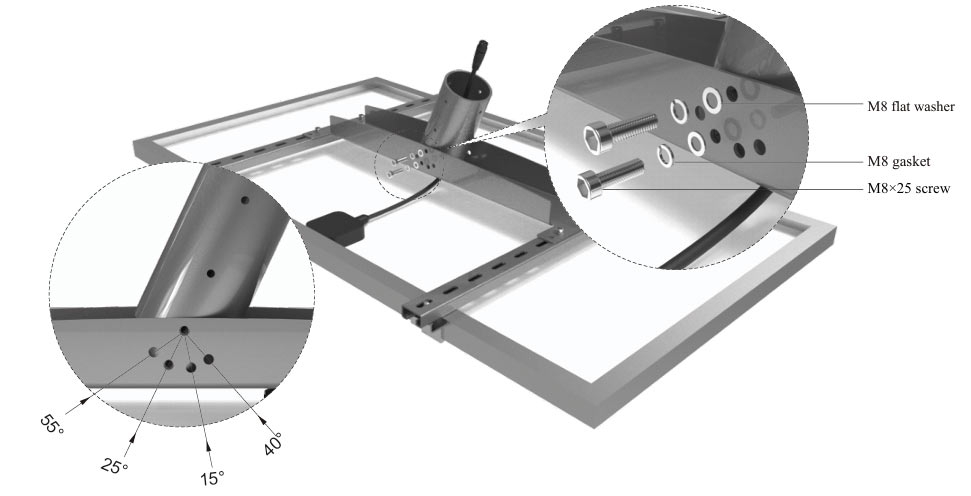
Installation of 50–110W Mounting Kit
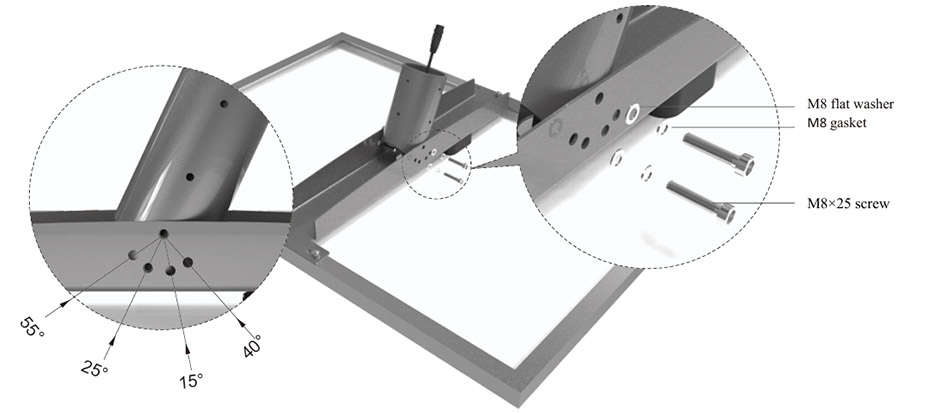
First, fix the U-shaped bracket to the frame of the solar panel as shown in Figure 1. The required hardware includes M8×16 bolts, M8 nuts, M8 flat washers, and M8 spring washers.

Select an appropriate angle to fix the sleeve bracket. The required hardware includes M8×25 bolts, M8 spring washers, and M8 flat washers.
Installation of 130–180W Mounting Kit
① insert 5 pcs of C-type nuts into the crossbar.
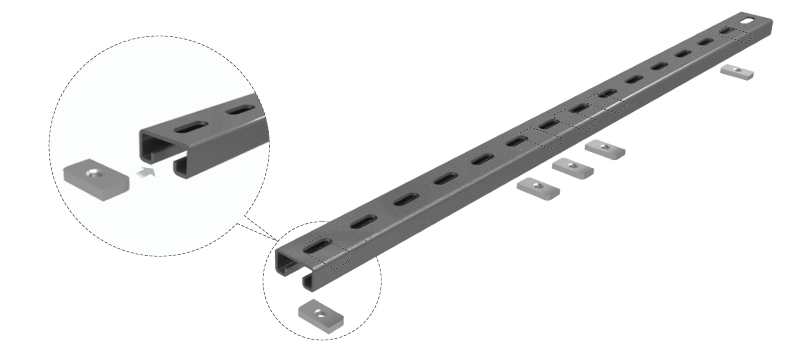
② Use 4 pcs of edge clamps, M8×40 bolts, M8 spring washers, M8 flat washers, and C-type nuts for the edge clamps to secure the two crossbars to the solar panel frame. Adjust the center distance between the two crossbars to 640 mm and center the solar panel.
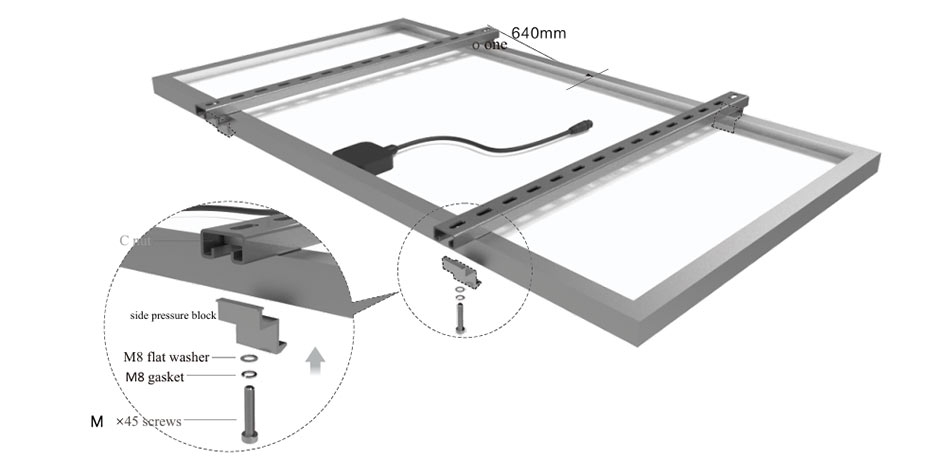
③ Use M8×25 bolts, M8 spring washers, M8 flat washers, and C-type nuts to fix the U-shaped bracket onto the crossbar.
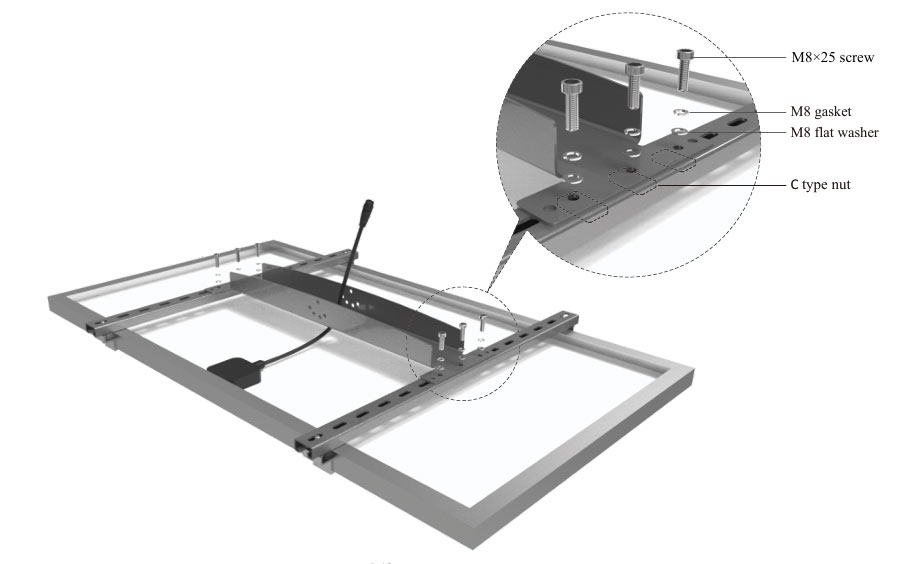
④ Select the appropriate angle for the fixed sleeve bracket, using M8×25 screws, M8 spring washers, and M8 flat washers. As shown in Figure.
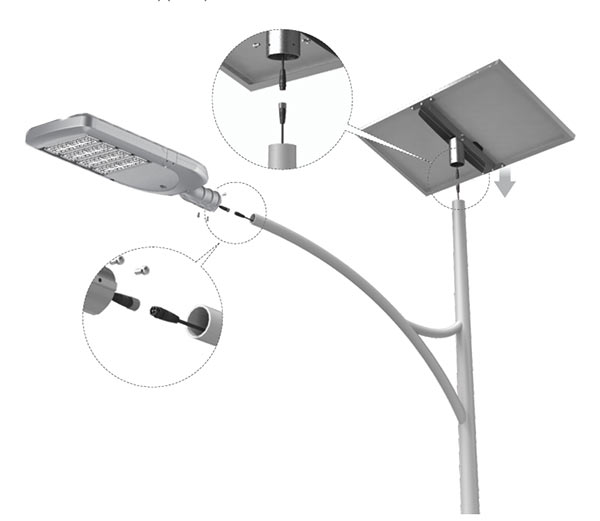
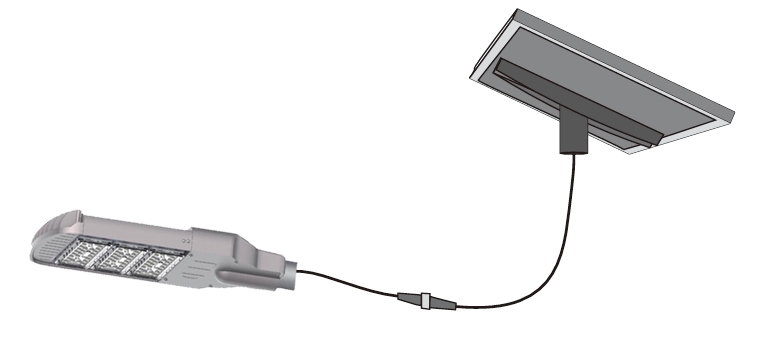
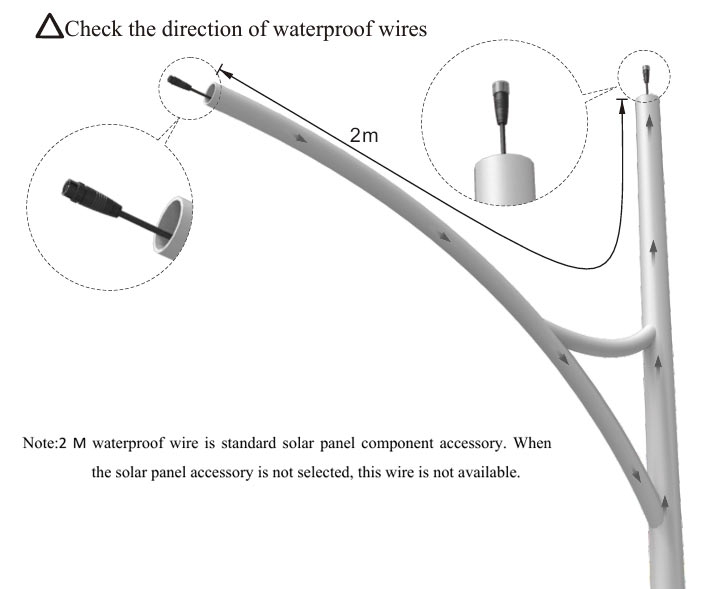
4. Cable Routing Through the Pole Arm
Thread the waterproof cable through the pole arm and lead it out from the top of the pole.
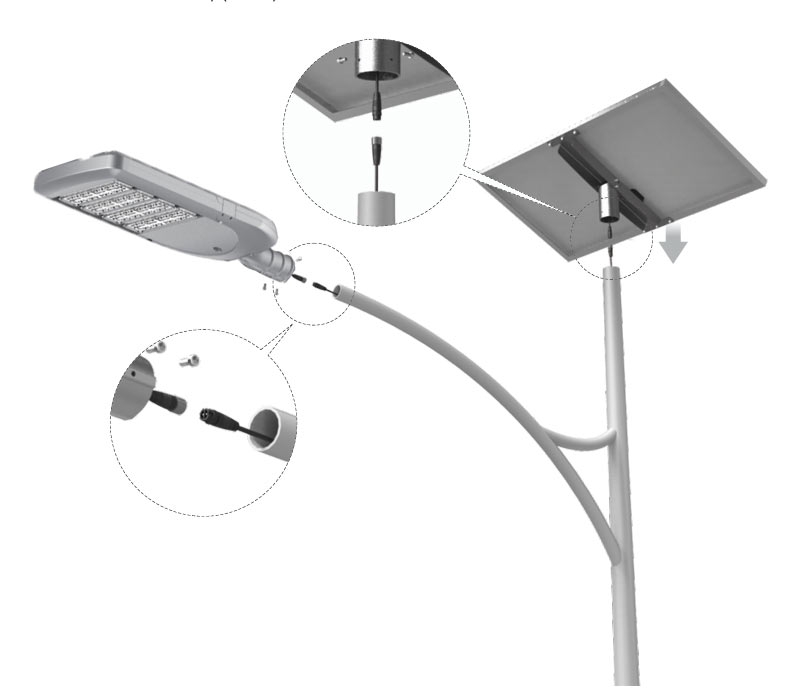
5. Install the Solar System
Connect the solar system to the waterproof cable inside the pole and tighten the connectors in sequence. Then insert the pole into the X-bracket and secure it with M8×16 mm bolts using a special tool (if using an electric wrench, set the torque to 14 N·m).
6. Install the LED Street Light
Connect the waterproof cable from the pole arm to the LED street light cable and tighten the connectors in sequence. insert the LED street light bracket onto the pole arm and secure it with M8×16 bolts, ensuring the LED street light is firmly mounted on the pole. Installation is complete. (If using an electric wrench, set the torque to 14 N·m.)
Troubleshooting Guide
No. | Malfunction | Inspection Steps | Solution |
1 | Light does not turn on at night | Check if the luminaire can be activated normally. | Test according to the "Activation Test" method in the "Activation and Installation" chapter of this manual. |
Check if the solar panel is blocked by houses or trees during the day, affecting sunlight exposure. | Remove obstructions or change the installation location of the luminaire. | ||
Check if the solar panel is illuminated by artificial light sources at night. | Remove the interfering artificial light source or change the installation location of the luminaire. | ||
2 | Lighting time at night is severely insufficient | Check if the solar panel is blocked by houses or trees during the day, affecting sunlight exposure. | Remove obstructions or change the installation location of the luminaire. |
Check if there is dust or covering on the surface of the solar panel, affecting sunlight exposure. | Clean the surface of the solar panel. | ||
3 | Abnormal motion sensor function | Check if the working environment temperature of the luminaire is close to human body temperature. | When the ambient temperature is close to the human body temperature, the sensitivity of the infrared sensor will decrease; it will return to normal after the ambient temperature drops. |
Check if the installation height of the luminaire is too high. | When the installation height exceeds 8 meters, the sensitivity of the motion sensor will decrease. It is recommended to lower the height or use other working modes. | ||
replace the damaged infrared sensor or controller. |
Yes. We provide specialized batteries for extreme climates, including heating films for cold regions and heat-resistant lithium cells for tropical environments.
The initial purchase price is slightly higher, but considering zero electricity bills and zero cabling costs, the Return on Investment (ROI) is typically achieved within 2 years.
We use reinforced cartons and wooden pallets to prevent damage during long-distance transit. For large projects, we recommend FCL (Full Container Load) sea freight to minimize shipping costs.
We offer a 3-5 year full-system warranty. If a quality issue arises, we will ship free replacement parts immediately after verification.
Our solar street lights carry CE, RoHS, IP66, IK10, and ISO 9001 certifications, meeting the standards for government and commercial projects worldwide.
Yes. We can customize power output, battery capacity, logo branding, and even industrial design based on your project requirements.
In dusty or low-rainfall areas, we recommend cleaning every 6 months. Heavy dust accumulation can reduce charging efficiency by over 20%.
This is usually due to battery aging, panels being shaded causing insufficient charge, or incorrect controller settings. We can assist you with remote troubleshooting.
LED Fixture: >50,000 hours; Solar Panel: 25 years; Lithium Battery: 5-8 years; Controller: 5-10 years.
No. It is a self-contained power system that requires no trenching, wiring, or grid connection, significantly reducing installation and labor costs.
The optimal angle depends on your local latitude. Generally, panels should face the equator (South in the Northern Hemisphere) at an angle equal to your latitude plus $5^{\circ}$ to $15^{\circ}$.
We primarily use LiFePO4 (Lithium Iron Phosphate) batteries. Compared to Gel or Lead-acid batteries, LiFePO4 offers a much longer cycle life (over 2000 cycles) and superior high-temperature resistance.
Monocrystalline panels offer higher efficiency (above 20%) and perform better in low light, making them ideal for all-in-one designs. Polycrystalline panels are more budget-friendly for large-scale projects.
Yes. Our systems are engineered with "Autonomy Days," typically supporting 3-5 consecutive days of illumination even in complete absence of direct sunlight.
Our products are designed to illuminate for 10-12 hours per night. With intelligent controllers, we can customize lighting modes, such as full power for the first 4 hours and energy-saving mode thereafter.
Contact Us
Be the first to learn about our new product launches and the latest news articles. Factory-Direct Manufacturing of Solar Street Lights, High Mast Lighting & Traffic Infrastructure1. Manufacturing Background & ScaleEstablished in 2017 and backed by a 20-year manufacturing heritage, j... Do you have any questions or requests?
Click below and we'd be happy to assist. Contact

Click to Chat.
Im online now.